This post features me discussing SPHINCS+, which is a PQC algorithm for digital signatures. It’s intended for use as a replacement for current signature schemes and is stateless (you don’t need to remember anything about prior signatures), tunable (you can make tradeoffs on signatures being fast to use vs smaller), and most importantly, based on present day hash algorithms. The final property, being based on hash algorithms, helps make it understandable without a good background in mathematics.
I’ll preface this with a small note about my credentials: Caveat emptor. I am not a cryptographer. Do not take anything here at face value. I have a bit over a decade of experience in product cybersecurity and am familiar with using various cryptographic algorithms. I have tried to include all of my source materials so that it is clear why I am saying something and you can do your own research. When reading this, assume I am a dummy trying hard with good intentions and will update anything I am emailed about.
Why Does This Matter?
Quantum computers are coming, and with them, the need for post quantum cryptography (PQC) that cannot be broken by them. At least, that’s what NIST said in 2016. Since then a slow, measured, and methodical hunt has been on to find PQC algorithms that can replace current “classical” algorithms for functions such as digital signatures. Citing NIST IR 8105:
It has taken almost 20 years to deploy our modern public key cryptography infrastructure. It will take significant effort to ensure a smooth and secure migration from the current widely used cryptosystems to their quantum computing resistant counterparts.
By 2022 the White House published a memorandum on the risks quantum computer posed to current security systems. Quoting from that:
Most notably, a quantum computer of sufficient size and sophistication — also known as a cryptanalytically relevant quantum computer (CRQC) — will be capable of breaking much of the public-key cryptography used on digital systems across the United States and around the world. When it becomes available, a CRQC could jeopardize civilian and military communications, undermine supervisory and control systems for critical infrastructure, and defeat security protocols for most Internet-based financial transactions.
The reasoning for why PQC research was needed was stated, but the urgency was not clearly stated. In addition to needing to ensure a smooth transition to new algorithms, data transmitted under classical cryptography is at risk for decryption by future CRQC’s. Patient healthcare information, financial transactions, classified military intelligence, could all be recorded today and decrypted 20 years in the future. With classified data in the US being considered classified for at least 25 years, patient information potentially for the lifetime of the patient, and financial transactions for who knows how long, it’s important to act now.
Why Hash Functions?
Most PQC algorithms are based on mathematical problems not used in common classical cryptography, such as lattices. Why are hash functions able to be used in PQC when algorithms like Diffie-Hellman and RSA can be broken?
The quick answer is “There’s no known good attacks against hash functions.” The best known attack, as of 2023, is the BHT algorithm which claims a novel use of Grover’s algorithm to decrease the amount of effort to find a collision from 2n/2 to 2n/3 . This paper was in turn disputed by DJB who noted “All of the quantum-collision algorithms in the literature are steps backwards from the non-quantum algorithm of [reference]”. Even the BHT paper noted issues with being able to implement this in the future stating “When we say that our quantum algorithms require Θ(k) space to hold table L, this corresponds unfortunately to the amount of quantum memory, a rather scarce resource with current technology.”
Grover’s algorithm, mentioned in the prior paragraph is a quantum algorithm that aims to solve the problem of function inversion. Given y = f(x) it attempts to calculate x when given y. For symmetric algorithms it decreases their “security strength”, the amount of computations required to determine the decryption key, by half. AES-256, with its security strength of 256 bits, has 128 bits of strength in the post-quantum world. That’s fine though. It’s AES-128, which in the post quantum world has 64 bits of strength, that is no longer safe to use. For a frame of reference on how strong 64 bits of strength are, in 2002 a distributed computing project was able to discover a 64-bit key via classical brute force in 1,757 days.
The algorithm that breaks public key algorithm schemes, such as Diffie-Hellman and RSA, is known as “Shor’s Algorithm.” It allows for factoring the prime numbers of an integer in an efficient manner, the difficulty of which is what gives those algorithms their strength in the pre-quantum world. It is the existence of this algorithm that provides the primary motivation for PQC.
Climbing to SPHINCS+
Being able to understand SPHINCS+ will take a good amount of background and history about other hash based cryptographic algorithms.
Silly metaphor picture for ascending stairs to reach SPHINCS+. Generated in SDXL 1.0 with prompt “pencil sketch, of sphinx statue on top of a tall tower, sphinx has glowing blue eyes, viewed from a distance, can see the entire tower, giant stairs leading to top of tower.” Flaming eyes were generated with “narrow, glowing blue flame, pointing upwards. Highly detailed. Transparent background” and added in after the fact. Text and arrows done via Excalidraw.
This is because SPHINCS+ is a pretty complicated algorithm. You can read it yourself if you like, it’s about 24 pages long and covers around 50 years of cryptographic history in the first couple of pages. To fully understand the algorithm, I’m going to walk through that history, a step at a time. SPHINCS+ sits upon a tower of prior cryptographic knowledge and the steps leading up to that tower are:
- Lamport Signatures
- Winternitz Signatures
- Merkle Hypertrees
- Stateful Signature Schemes
- Few Time Signatures
- Stateless Signatures
and finally at the top of the tower, SPHINCS+.
Lamport Signatures
Lamport signatures are the first hash based signature. Originally published by Leslie Lamport, of distributed systems fame, in 1979 this scheme presented a simple way to use hash functions to perform a digital signature.
Figure showing how the Lamport Signature Scheme creates the keypair for signing a single bit.
Lamport signatures sign a message one bit at a time. For each bit there are 2 secret keys created, Secret 0 and Secret 1 in the diagram above. Each is ran through a hash function to create the corresponding Public values. For the sake of an example it can be assumed that each Secret value is 256 bits in length. The Hash Function used is “SHA-256” and the Public values are each therefore 256 bits in length as well.
Figure showing how signing a single bit works.
The public key is provided to anyone wishing to verify the value, through means outside of this post. To sign a single bit, the secret value corresponding to that bit is revealed as the signature.
Figure showing how signing multiple bits works
Since each bit has its own pair of secret values, signing multiple bits involves revealing the secret for each bit. Each bit having its own pair of keys is crucial. Lamport signatures are “one time signatures” and every pair of keys:
- Must be unique
- Can only be used once This is because revealing the secret value for a bit means that an attacker would know it as well. If the keys were to be re-used to sign a second message, an attacker could use already revealed secrets to sign a message of their choosing, since they would know both the private keys for the 0 and 1 values of a bit in a particular position. The more messages signed with a keypair, the higher the chance of revealing both the secrets for the 0 and 1 bits.
Figure showing how a 3 bit message is verified.
Verification is performed by hashing each signature for each bit. It is a success if the hashed value corresponds to the public key for that bit, for that value of the bit.
While easy to understand, this produces large signatures. Assuming that the message itself has been hashed with a function (such as SHA-256) which produces 256-bit signatures, and each secret value is 256 bits in length, this will result in the following sizes:
- Message: 256 bits
- Secret: 2 keys * 256 bits / key * 256 bits = 131072 bits
- Public Key: 2 keys * 256 bits / key * 256 bits = 131072 bits
- Signature: 256 bits / secret * 256 message bits = 65536 bits
- Sending a message + public key + signature = 256 + 131072 + 65536 = 196864 bits or about 192 kb of data to transmit.
And the worst part is, a second message will require a new public key to be sent! This forms the basis for hash based cryptography, but can be vastly improved on.
Winternitz Signatures
Witernitz One Time Signatures (WOTS) are an improvement on Lamport Signatures. This came out around the same time, but is more complex and can be thought of as an improvement on the Lamport signature scheme. WOTS relies on the concept of “hash chains” where a hash function is applied multiple times and the hash function encodes the signature value of multiple bits.
Figure showing key generation in WOTS. Each private key chunk is hashed the same number of times to yield a public key chunk.
Key Generation in WOTS has a number of private key chunks (this number is “tunable” and will be discussed below) be created and hashed a number of times. The number of times each chunk is hashed (also a tunable value) is the same. The final output of each multi-hashed chunk is the corresponding public key chunk.
Figure showing the WOTS hash chains for an 8 bit message, where the message is divided into 2 hash chains.
WOTS is tunable so that the number of bits to hash per message chunk can be adjusted to trade off on message size vs work. This parameter is normally called w, which stands for “Winternitz parameter”, and represents the number of bits to sign. w also is used to calculate the length of the hash chain as 2w
. In the above example w = 4 which means that “24
=16” hashes are needed per signature chunk.
Signing a message then involves performing N hashes where N is the value of the bits covered in that message chunk. In the above example this means that Bits 0 -4 are hashed 6 times to create that signature chunk.
Verification requires, wait for it 🥁, more hashing. To verify each signature chunk, the signature is hashed w - N times and checked against the corresponding public key chunk. If they match, the signature is considered verified.
WOTS provides a much more efficient scheme than Lamport Signatures. Comparing the example above the following can be observed. This assumes that private key chunks are 256 bits each and the hash function used outputs 256 bits.
| Lamport | WOTS | |
|---|---|---|
| Private Key | 8 * 2 * 256 = 4096 bits | 2 * 256 = 512 bits |
| Public Key | (Same as Private) 4096 bits | (Same as Private) 512 bits |
| Signature | 8 * 256 = 2048 bits | 2 * 256 = 512 bits |
| Total to Send | 4096 + 2048 = 6144 bits | 512 + 512 = 1024 bits |
Table comparing Lamport vs WOTS signature sizes
WOTS ends up being 83% smaller to send a single message and signature pair. This is much better! However WOTS suffers from the same one time use issue as Lamport. A second message requires a second public key pair. There’s still room to improve here.
Checksum
One interesting issue is that the message and signature can still be modified for WOTS. Consider the following, somewhat contrived, case:
A message is signed via WOTS stating “Transfer $100 to er4hn” and the “100” in that message falls exactly within a message chunk. Also assume that w = 8. So this looks something like:
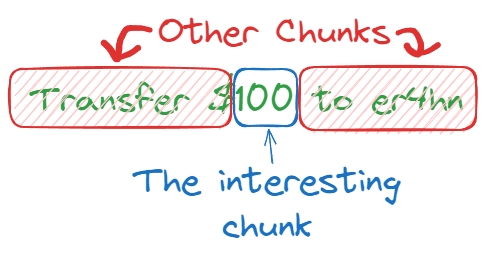
Picture showing the message and how it is chunked.
The value 100 ends up being hashed 100 times and has a signature chunk, defined S. But what if you want to increase the value being transferred to er4hn? To change the message from 100 to 101 and ensure the signature still validates the signature chunk would be replaced with S' = Hash(S), representing 101 hashes. (Note that: In reality the message being signed would be a hash of the transfer amount, and the chunk with the hash would need to be a higher number than the original signed chunk, but with enough testing of values this could be possible.)
To solve this a checksum is needed. This checksum must prevent any set of chunks in the message from increasing. How can this be done? The answer is to make a value which decreases as each chunk increases. To do so the message is broken into w-bit blocks. Assuming the message above is 32 bits in length, that’s 4 blocks, one of which is the value 100 to be transferred. The maximum value of these blocks is known, that’s “max = 4 * (2w
-1) = 60”. The checksum then becomes “60 - SUM(block1, block2, block3, block4)”. Increasing the value of any block will decrease the checksum. The checksum is also covered in the signature. Since the attack requires increasing the value of every block, including the checksum… the attack is thwarted.
Broken out a little more:
- Break the message (or more appropriately, hash(message)) into
countw-bitblocks. - Calculate “max = count * (2w -1)”
- Calculate “checksum = max - SUM(blocks)”
WOTS+
WOTS is pretty old and not exactly the state of the art. In 2013 Andreas Hülsing published a paper on a signature scheme called WOTS+. This is an improvement on WOTS that allows for smaller, but still strong, signatures.
To be honest I didn’t read too much into it, beyond seeing it get used later on in SPHINCS+ and readings others that I respect discuss it a bit. For all intents and purposes WOTS+ is the ideal one-time hash based signature scheme.
Hypertrees of Keys
At this point WOTS+ allows a user to have a cryptographically secure one-time signature over some data. However each key can only be used once. Given the amount of effort required to send a key to a verifier, this makes it hard to scale up how these signatures can be used.
Wherever there is a problem though, there is also a solution. Merkle hypertrees allow for efficient distribution of keys by only requiring a single value, the root node of the hypertree, to be sent to a verifier.
Merkle Tree
Before getting into what a hypertree is, one needs to start with a merkle tree. This isn’t the first time I’ve written about these structures.
Figure showing a merkle tree. This is based on the image from: https://commons.wikimedia.org/wiki/File:Hash_Tree.svg
Merkle trees have the leaves of the tree be hashes of the chunks of data. Each branch node is then the hash of the concatenation of the child’s data. The root node thus contains information about every node below it, down to the data blocks that create the leaf nodes. The main utility of Merkle trees is that the integrity of a data block can be checked without needing to know the other blocks. If a verifier, just starting with the root node, wanted to check the integrity of L1 they would just need Hash 0-1, and Hash 1. The verifier can calculate Hash 0-0 and Hash 0 themselves. Once calculated the verifier can check the values of Hash 0 and Hash 1 by calculating they match the value of the root node. At this point the verifier has verified the path leading to L1 and therefore knows that they have the correct value for that data chunk.
To apply this to hash based signatures, consider if each data chunk was a different public key. Now the root node contains information about a number of public keys. A signature can point to a specific public key, say L3, and then include the required intermediate hashes: Hash 1-1, and Hash 0 that are required to check that L3 is a valid public key for this merkle tree.
To generate this tree the signer would start with a (secret) randomly generated number. This secret number is used alongside a Pseudorandom Function (PRF) to generate all of the public/private keypairs for the leaf nodes.
This scheme, while offering a way to send a number of public keys at once, still doesn’t scale that well though. For sending a few thousand keys, this will be fine. But on the internet there are numerous messages being sent all the time. Every message that uses TLS would require its own signature, which means its own unique key being used. If you want to send 264 messages with a single tree, that is far too much to calculate.
Merkle Hypertree
A hypertree is a tree of trees, sometimes called a multilevel tree. The leaf of a tree leads to the root node of a new tree.
Figure showing a simple hypertree. Only
Root Bis drawn out. Keys for Roots C, D, and E are not shown. Green represents the public key being used, Orange represents values provided in the signature (The Green node is a part of the signature as well), and Blue represents what the verifier can calculate as part of the verification process.
A property of hypertrees is that the value of the root node of a merkle tree in a hypertree only depends on the leaf nodes of that merkle tree. In the above example the value of Root A only depends on Leaf 1 - A, Leaf 2 - A, Leaf 3 - A, and Leaf 4 - A. Each of the A leaves can generate a tree of their own, this is what makes it a hypertree. With 2 levels of trees, and 4 keys per tree, the number of keys distributed has now grown from 4 to 16. Since the value of the leaf nodes is what determines the merkle tree root value, the full set of 16 keys doesn’t need to be generated, only the 4 leaf nodes of the A tree need to be generated. The tree for Root B is expanded to show the key in that tree, but Root B only needs to be expanded on demand. Stated differently, the Leaf 1-A node, and not the Root B values, are what contributes to the Root A value. This makes it possible to efficiently distribute many more keys with a single root node value.
However, because other roots, such as Root B do not influence the value of Root A something needs to be done so that those intermediate roots can be trusted when verifying a signature. Since each leaf node is a public key, this is handled by having the leaf sign the next root node. So a signature made using Leaf 2 - B’s public key would contain:
- The public key (data chunk) for
Leaf 2 - B Leaf 1 - BBranch 2 - B- A signature on
Root B(Root B can be calculated with the above values) made by the public key referred to inLeaf 1 - A - The public key referred to in
Leaf 1 - A Leaf 2 - ABranch 2 - A
Stateful Signatures
By using a merkle tree of keys and signing messages with WOTS (or WOTS+) it is possible to create a signature scheme. Popular algorithms that do this are “XMSS” (eXtended Merkle Signature Scheme) and “LMS” (Leighton–Micali Signatures). Each has some minor tradeoffs, but are fairly similar: A merkle tree is generated with a set of keys. The root node is used as the public key. A signature is produced over a message using one of the keys. Various improvements are made beyond my explanations to keys, signatures, and all other portions to prevent attacks. Hypertree variants of XMSS and LMS also exist and are called XMSSMT and HSS, respectively.
Because the security strength relies on keys not being re-used, the signature scheme must ensure that every key is used only once. For XMSS (RFC 4391, Section 4.1.9) this also means that the same message being signed multiple times is not idempotent. In other words, each signature on the same message will use up another key. The tracking of keys is done by the code which produces the signature. This storing state of used keys is what makes the signature stateful.
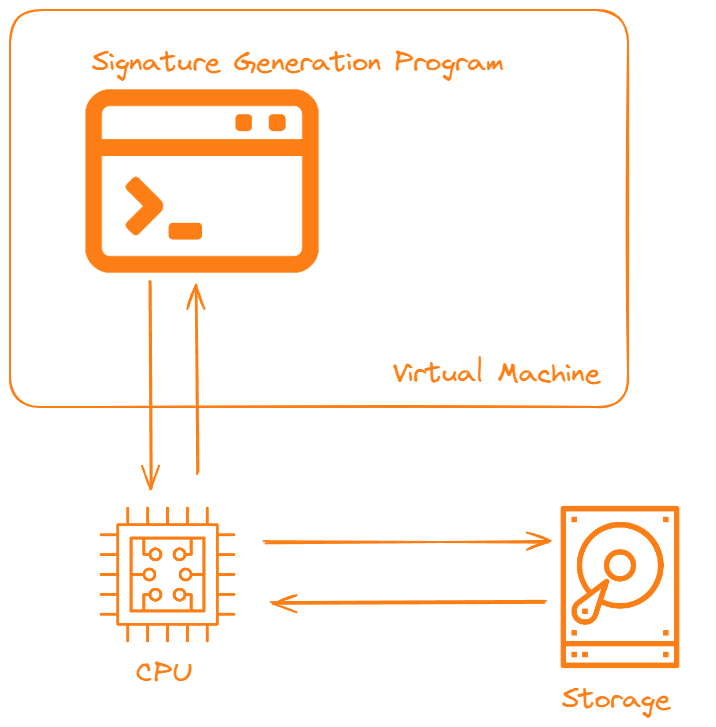
Diagram showing potential points of failure for a stateful signature scheme to save state properly. Each component is labeled. Each component that may fail is labeled in orange.
Stateful signatures have a major downside, which is that they need to store state. If a key is re-used the signature scheme falls apart. Looking at a simple and standard deployment of a signature generation program inside a VM, with some attached storage the following issues can occur:
- Program code does not properly update used keys. This would be most likely to occur in edge cases, such as the storage returning a temporary error.
- Virtual Machine is cloned, perhaps for backup purposes, and the program maintains the key state in RAM, meaning that when the VM resumes the program can re-use old keys.
- The CPU skips some step for bizarre CPU reasons (okay, this one is kind of weak. Let’s say that a cosmic bit flip causes an error state. It wouldn’t be the first time the sun has ruined cryptography.)
- Storage doesn’t properly record the keys used, a backup fails, data is not flushed to disk before a power outage, data on disk is corrupted, being tied to the real world there are a million ways storage can fail.
Let’s say that there is a one in a billion chance of this occurring. All the best software was bought, it’s been integrated with the most durable hardware using the best in class procedures. Cloudflare, if you believe them, serves 50 million HTTP requests per second. Let’s say each of those is a TLS request since Cloudflare offers that for free to everyone. Assume each TLS request uses one XMSS signature. Every 20 seconds one of those “one in a billion” chances hits. You can adjust the numbers however you want, but because of the sheer scale at which cryptography is used, this means that stateful signatures will fail at some point. This is why NIST did not approve of stateful signature for general use, stating:
Stateful hash-based signature schemes are secure against the development of quantum computers, but they are not suitable for general use because their security depends on careful state management. They are most appropriate for applications in which the use of the private key may be carefully controlled and where there is a need to transition to a post-quantum secure digital signature scheme before the post-quantum cryptography standardization process has completed.
Few Time Signatures
The next topic to cover in the ascension to SPHINCS+ is few time signatures. Until now all of the signatures discussed have been one time signatures: A message can be signed once with one key. Signing twice (or more) is catastrophic and will allow others to forge messages.
Few time signatures, as their name implies, are hash-based signature schemes which allow for signing multiple messages with one key. This isn’t an unlimited number of signatures like classical signature schemes, this is still a limited number. How limited depends on the desired level of resistance to attackers, which will be covered after discussing the first algorithm, HORS.
Hashing to Obtain a Random Subset (HORS)
Hashing to Obtain a Random Subset, or HORS (your guess as to how to pronounce..) is the introductory few time signature scheme that will serve as a basis to be improved upon.
Figure showing keys being generated in HORS. The array in this case is of length 65536 which means
a = 16.
The key variable to tune in HORS is a which represents the number of chunks a message will be broken down into. This will be used more during signing, but for key generation the length of the private key is 2a
where each element in the private key is a random number. This means that each of the xi
values in the above figure would be a random number of, say, length 256 bits. The public key is then the concatenation of the hash of each of those x values. Assuming that a = 16 and each x entry is 256 bits in length the final public key is 2^16 * 256 = 16777216 bits.
Figure showing how a 256 bit hash is turned into a signature.
a = 16,k = 16in this figure.
To sign the message the hash of the message is broken down into chunks. The number of chunks is called k and k = ${Length of Hash Output} / a. Each of the chunks, ai
then has its value used as an index into the private key. The signature for the chunk ai
is just the private key.
To verify a signature the verifier recreates the hash of the message with the same ai chunking. The verifier uses the value of ai to index into the array of public key values and obtain the expected public key value. The hash function is then run over that corresponding ai chunk in the signature to verify that: Hash(Private Key[ai ]) == Public Key[ai ] .
Why is HORS a Few Time Signature?
What makes HORS a few time signature and not a one time signature? The answer is that you lose less keying material each time you sign with HORS compared to a Lamport signature. Assuming an even distribution of key chunks being used (i.e. each ai chunk was a unique value) the prior example would have used 16 keys out of 2 ^ 16 total keys, which is a miniscule amount. In contrast, a Lamport signature would have lost around half of the total keys.
Note: In order to ensure that an attacker cannot chose a set of messages designed to leak specific private key chunks, the signer can include a random string as part of the hash and also include that random string in the signature.
Deciding how many messages a private key will sign with a few time signature requires deciding how hard it should be for an attacker to forge a signature on a message they want signed. For example, let’s say that, using the prior example of a = 16 and k = 16 we sign 4 messages. How hard is for an attacker to forge a signature that uses those revealed private key chunks? This would require an attacker to create a message M such that Hash(M) uses only those revealed private key chunks. The math for this works out as:
( k private keys / message )* (4 messages) = 64 private keysrevealed64 / (2 ^ 16) = (2 ^ 6) / (2 ^ 16) = 2 ^ (-10)chance of a single chunk having a value ai that has already been revealed in a prior message, due to hash functions having an even distribution.- What I mean by “hash functions having an even distribution” is that the attacker must try different input values to “guess” at one having the desired output and that output is random and uncorrelated to the input each time.
(2 ^ (-10))^k = (2^(-10))^16 = 2^(-160)for the whole message.- This means that the attacker will have to make around
2^(160)attempts to craft a message which only uses revealed private key chunks.
Is this good enough? That depends on your level of concern about attackers. For SPHINCS+ specific standards were laid out by NIST and will be covered later.
Downsides of HORS
HORS does have a few downsides that can be improved upon as well: the public key size, and the potential for a signature to re-use the same private key chunk.
The public key size is something evident from earlier. A Lamport signature has a public key of 4096 bits, whereas the HORS example from above has a signature of 65536 bits, 16 times larger. Since most use of few time signatures informally deems a “few” as “less than 10” this isn’t a clear advantage in terms of public keys to send over.
The other problem is that messages may not have unique ai values for all of the a-chunks in the hash of the message. For an attacker controlling the message they wish to forge a signature over, they can save work by trying to find a message where multiple chunks match in value, thus decreasing the number of private key chunks that need to be revealed.
HORST: HORS with 🌲's
HORST is HORS with (merkle) Trees and it solves the issue with public key distribution by making the chunks of the public key leaves of a merkle tree. Since merkle trees do not encode order in the leaf nodes each leaf node also needs to have some data that specifies which public key chunk it is. Now only the value of the root node needs to be distributed. This brings down the prior example (assuming a hash function outputting 256 bits) from 65536 bits to 256 bits.
The tradeoff for this is now the signature and verification process is much more complicated. Now every signature must also include the public key chunks, and the intermediate values of the merkle tree to trace that path back to the root. Verification is left as an exercise for the reader, but involves validating the values exist in the merkle tree, in the correct order (i.e. public key chunks y1 and y2 were not swapped. This is why ordering info needs to be included in the tree when generated), and then performing the HORS signature check.
This scheme, while an improvement, also does nothing to solve the repeated a-chunks issue.
FORS: Forest of Random Subsets
FORS is the hypertree variant of HORST. Now each leaf in the root tree represents an “i” in ai , i.e. a single position. Each subtree is it’s own private key for the full range of values that ai can take on.
FORS merkle hypertree with
a = 4showing the subtree for a1 and a single key for a1 equal to 1.
Now two separate positions, say a1 and a4 , having the same value won’t result in a decrease of security. Each of the positions has their own unique set of values, and their own unique set of private keys. Since hypertrees don’t increase the size nor computational complexity of generating the root merkle tree value, this is cheap to generate. The trade off comes once again in making the signatures larger and more complex.
Stateless Signatures
At this point, the journey to the top of the tower, and to explaining SPHINCS+, is nearly complete. SPHINCS+ is a type of stateless signature and this section explains the theory behind those.
A stateful signature (hash based) scheme is one where each time a key is used, the usage of that key must be tracked so it cannot be used again. A stateless signature scheme is one where the keys used to sign a message do not need to be tracked. That’s it. Signing a message still releases secret information, so there are still limits on how many messages can be signed. Exceeding the limit on signing messages will still allow for forged signatures on messages. With it laid out so simply, it sounds dangerous, but it’s still possible to build a reasonably strong scheme.
In the prior section on few time signatures it was shown that a few time signature scheme can sign several messages with the outcome being that each signature leaks some of the private key. As long as the amount leaked is kept low, the scheme requires too much work for an attacker to forge messages. This is the key insight into how stateless signature schemes work. A large maximum number of signatures to generate can be set, say 264 signatures. Then a threshold can be decided for what is an acceptable chance that a key will be reused. With those two inputs, it’s possible to determine a number of keys needed that will allow for that number of signatures while staying below the acceptable threshold of key reuse. This number of keys will be huge, so a hypertree is used to store the keys and distribute the root node of the public keys. Because only the root tree needs to be calculated the keys don’t even need to be known in advance for this to work.
The other optimization is to make signatures idempotent. The same message being given to a stateless signature scheme should result in the same output. This both prevents leaking additional parts of the private key for the same message, and is tied to how the signing key is chosen. This is accomplished by using a PRF to choose the signing key. The hash of the message is fed into the PRF, which then outputs a random stream of values. These values are then used to decide which path to follow in the hypertree, from the root down to the last leaf node which has the signing key. Because this is done with a PRF, the choice of signing key is random. Because the input to the PRF is the hash of the message, the same signing key will be used for the same message.
SPHINCS+
All the different building blocks for SPHINCS+ have been discussed at this point. Now it is possible to state what SPHINCS+ is.
SPHINCS+ hypertree diagram showing how the inner trees are signed with a WOTS+ signature. The node before the signature is a FORS tree and the message itself is signed with FORS.
SPHINCS+ is a stateless signature algorithm which is based on a hypertree of keys. The inner trees are signed via WOTS+, using an XMSS signature (which makes the inner trees look like XMSSMT ). The messages themselves are signed via FORS, where the root node of the FORS tree was signed via the prior mentioned WOTS+ signature. FORS is used for the messages to decrease the total number of keys needed since there can be some re-use. WOTS+ is used for the inner trees since those will only ever be used once to sign the root node of the next tree.
There are various knobs that can be tweaked for fast signatures (f postfix in the below table) vs small signatures (s postfix in the below table) vs security strength, all sorts of special attacks defended against, hash algorithms that can be chosen, etc, but that’s the core of SPHINCS+. This 2 paragraph summary is only able to be so short because of all the prior history that lead up to it.
SPHINCS+ was designed around the NIST call for proposals for PQC. SPHINCS+ supports 264 signatures and is stateless (per the proposal requirements), which combined with adhering to a standard API for crypto operations, makes it a drop in replacement for classical signature schemes.
| Param Set | public key size | secret key size | signature size |
|---|---|---|---|
| SPHINCS+-128s | 32 | 64 | 8 080 |
| SPHINCS+-128f | 32 | 64 | 16 976 |
| SPHINCS+-192s | 48 | 96 | 17 064 |
| SPHINCS+-192f | 48 | 96 | 35 664 |
| SPHINCS+-256s | 64 | 128 | 29 792 |
| SPHINCS+-256f | 64 | 128 | 49 216 |
Table 6 of the SPHINCS+ Submission. All sizes shown are in bytes.
| Algorithm & Parameter Set | Public Key Size | Secret Key Size | Signature Size |
|---|---|---|---|
| Falcon-1024 | 1793 | 2305 | 1280 |
| Dilithium5 | 2592 | 4864 | 4595 |
Comparison of other NIST PQC Digital Signature choices. All sizes are in bytes. Parameter sets in the table represent the highest security level, which is comparable to the SPHINCS+ parameter sets with “256” in their name. Data taken from Open Quantum Safe.
It’s worth noting that SPHINCS+ is slower and ends up requiring significantly larger signatures than other PQC choices for digital signatures. Other algorithms are based on fields of mathematics that are believed to be hard for quantum computers to solve and applying them to cryptography. While this is impressive and has been looked over extensively issues may arise later since this is still a developing field. What I like the most about SPHNICS+ is that compared to things like lattice based cryptography I find it more approachable since I have a better intuition, and more experience, around hash functions than I do for lattices. If lattice based cryptography develops core issues later on, this also serves as a safe backup algorithm to switch over to.
Acknowledgements
Special thanks to nightxade for helping improve on my explanation of Merkle Hypertrees.
References
The following sources of information were invaluable in putting together this post. I cannot thank the authors enough for the time they put into sharing their material. I apologize for any incorrect statements based on what is likely my misunderstanding of their work. Please note this is provided in addition to any other links earlier in the blog post.
- https://www.youtube.com/watch?v=jiU0ICoiPI0: Introduction to Hash Based Signatures by John Kelsey. This was what allowed me to really understand how SPHINCS+ works and dig into the paper.
- https://csrc.nist.gov/csrc/media/Presentations/2022/crclub-2022-10-19a/20221020-crypto-club-kelsey-slides-MD-hash-sigs.pdf: Another set of slides by John Kelsey that describes how this all works.
- https://cryptobook.nakov.com/quantum-safe-cryptography: Discussion of why hash functions are quantum safe
- https://sphere10.com/articles/cryptography/pqc/wots: Great description of WOTS signatures.
- https://www.rfc-editor.org/rfc/rfc8391.html: The RFC for XMSS.
- Wikipedia: My reasonably trusted source for looking up various topics and trying to make sense of them.